C# code everywhere thanks to the Portable Class Library
These days if you can write code with C# you can write code for Windows, Linux and OSX, your code can run on Desktop, Server, Mobile or Embedded Devices. So C# runs pretty much everywhere which if you are a C# developer is a great thing!  Only little hiccup, even though C# is a standardised language, there are multiple runtimes existing today on which C# runs. This may lead to the assumption of having to rewrite code for every runtime. As the standard .Net C# library can not be reused on a Silverlight runtime, or the new Windows RT runtime, or I think you get the message. But fear not – thanks to the Portable Class Library (PCL) one is able to write code that can be reused over multiple platforms.
Portable Class Libraries
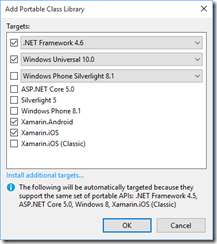
When adding a Portable Class Library (PCL) you will have to choose which platforms you want to use the platform on. The supported platforms have an impact in the functionality the PCL provides without adding any additional libraries (usually via NuGet). You can find a list of libraries supported by each platform on MSDN.
For this post we will want to reuse our code on the following platforms:
- Universal Windows App (Windows 10)
- Classic desktop WPF app
- iOS (with Xamarin)
- Android (with Xamarin)
To keep things simple the logic in the app will be creating a list of people. We will even be able to share our view models from the PCL so the only overhead we will be having when creating the app is the actual UI code and wiring up the view models to the actual views. Now in this setup the timesaving’s might seem marginal but think about your standard business app and the savings will start to up add up quickly in a major way.
Creating a PCL
Adding the platform specific projects is pretty straight forward. Simply add the corresponding project template to the solution when adding a new project, so I’ll leave it at that and go over to adding a PCL. When adding the PCL a dialog will be opened offering to choose the platforms that shall be supported i.e. can consume the PCL.
The iOS and Android option will show up after installing the Xamarin tool chain.
With the platforms chosen we can now start implementing the “business logic” which in our case is a simple generator that we invoke, called PersonService.cs:
public class PersonService
{
    public async Task<IEnumerable<Person>> GetPeople(int count = 42)
    {
        var people = new List<Person>(count);
        // In case of large counts lets be safe and not run this on the UI thread
        await Task.Run(() =>
        {
            for (int i = 0; i < count; ++i)
            {
                people.Add(new Person{FirstName = NameGenerator.GenRandomFirstName(), LastName = NameGenerator.GenRandomLastName()});
            }
        });

        return people;
    }
}
To present our data to the UI we will use the MVVM pattern.
Adding MVVM Light
When using MVVM in a project (which is like always for me  ) I prefer using MVVM Light. MVVM Light can be added by simply installing a NuGet package:
PM> Install-Package MvvmLightLibs
As we will access the view models from the platforms make sure to add the MVVM Light libraries also to the platform specific code bases.
Now we can add the view model MainViewModel.cs that will hold the list of people we will display.
public class MainViewModel:ViewModelBase
{
    private readonly IPersonService _personService;

    public MainViewModel(IPersonService personService)
    {
        if (personService == null) throw new ArgumentNullException(nameof(personService));
        _personService = personService;
        if (IsInDesignMode)
        {
            People = new ObservableCollection<Person> {new Person{FirstName = "Doctor Who"}, new Person {FirstName = "Rose", LastName = "Tyler"}, new Person {FirstName = "River", LastName = "Song"} };
        }
        else
        {
            People = new ObservableCollection<Person>();
        }
    }

    public ObservableCollection<Person> People { get; set; }

    public async Task InitAsync()
    {
        var people = await _personService.GetPeople();
        People.Clear();
        foreach (var person in people)
        {
            People.Add(person);
        }
    }
}
Next we still need to configure the ViewModelLocator.cs, which allows us to easily manage dependencies.
public class ViewModelLocator
{
    public ViewModelLocator()
    {
        ServiceLocator.SetLocatorProvider(() => SimpleIoc.Default);

        SimpleIoc.Default.Register<IPersonService, PersonService>();
        SimpleIoc.Default.Register<MainViewModel>();
    }

    public MainViewModel MainViewModel => SimpleIoc.Default.GetInstance<MainViewModel>();
}
So now we have all of our cross platform code setup. Let’s get it running on our desired targets.
The platforms
On the platforms we can simple reference the PCL like any other library we might use and access the features. On our platforms we will have to do the following steps:
- Create the UI
- Hook up theViewModelLocator.cs
- Wire up the view model to the view
Let’s do these steps for the Universal Windows App.
Universal Windows App (UWA)
For the view we will simply add a ListView to the MainPage.xaml:
<Page
    x:Class="PclSample.UWA.MainPage"
    xmlns="http://schemas.microsoft.com/winfx/2006/xaml/presentation"
    xmlns:x="http://schemas.microsoft.com/winfx/2006/xaml"
    xmlns:local="using:PclSample.UWA"
    xmlns:d="http://schemas.microsoft.com/expression/blend/2008"
    xmlns:mc="http://schemas.openxmlformats.org/markup-compatibility/2006"
    DataContext="..."
    mc:Ignorable="d">

    <ListView ItemsSource="{Binding People}">
        <ListView.ItemTemplate>
            <DataTemplate>
                <StackPanel Orientation="Horizontal">
                <TextBlock Text="{Binding FirstName}"/>
                <TextBlock Text="{Binding LastName}"/>
                </StackPanel>
            </DataTemplate>
        </ListView.ItemTemplate>
    </ListView>
</Page>
Under Windows (this is also true for WPF) MVVM Light really integrates really nicely. The Locator we can simply add to the App.xaml:
<Application
    x:Class="PclSample.UWA.App"
    xmlns="http://schemas.microsoft.com/winfx/2006/xaml/presentation"
    xmlns:x="http://schemas.microsoft.com/winfx/2006/xaml"
    xmlns:local="using:PclSample.UWA"
    RequestedTheme="Light">
    <Application.Resources>
        <vm:ViewModelLocator x:Key="Locator" xmlns:vm="using:PclSample.Core" />
        <ResourceDictionary />
    </Application.Resources>
</Application>
This allows us to access properties from the ViewModelLocator.cs class within our view(s) i.e. MainPage.xaml. So the next step would be wiring up the view model to the views DataContext, which will populate the view:
<Page
    x:Class="PclSample.UWA.MainPage"
    xmlns="http://schemas.microsoft.com/winfx/2006/xaml/presentation"
    xmlns:x="http://schemas.microsoft.com/winfx/2006/xaml"
    xmlns:local="using:PclSample.UWA"
    xmlns:d="http://schemas.microsoft.com/expression/blend/2008"
    xmlns:mc="http://schemas.openxmlformats.org/markup-compatibility/2006"
    DataContext="{Binding Source={StaticResource Locator}, Path=MainViewModel}"
    mc:Ignorable="d">

    ...
</Page>
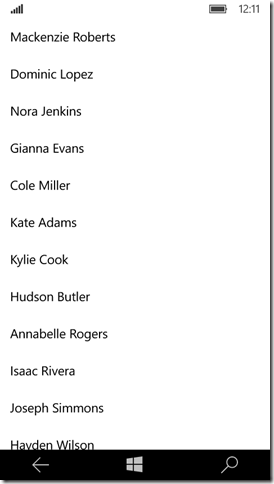
Now all is set and we can enjoy the view of our light weight UWA.
Windows Presentation Foundation (WPF)
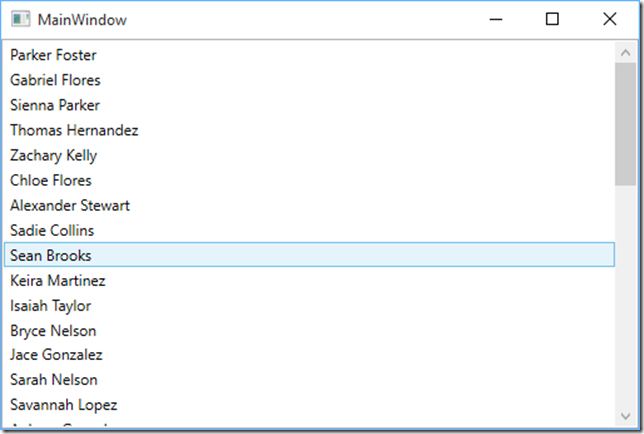
Following the same steps as in the UWA in a WPF app will lead to the same result.
So we can reuse all of our business logic from one Microsoft client development model to an other one. Isn’t that just great?  But wait there is more. We can take the C# code outside of the Microsoft Ecosystem. With for example Xamarin we can reuse our C# code on iOS and Android.
iOS
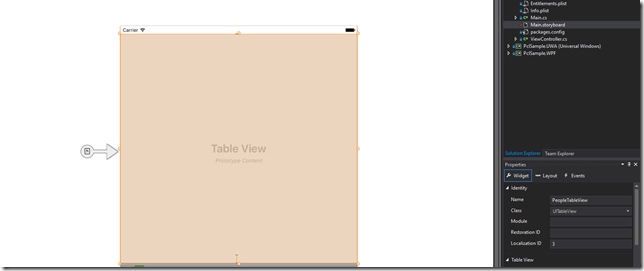
Under iOS the UI is usually created in a designer (similar to Windows Forms) so there is not much code to show. We add the ListView equivalent from iOS a UITableView to a page and give it a name, in this sample PeopleTableView.
Setting up the ViewModelLocator.cs is not quite as elegant when we leave the Microsoft platforms but then again it is done just as easily. In the AppDelegate.cs which is the start up point of every iOS app we simply create an Instance of the ViewModelLocator.cs and store it in a property. The property then can be accessed throughout the iOS app. The Wiring up of the view model is done in the ViewController.cs which is linked to the view that we setup earlier:
public partial class ViewController : UIViewController
{
    ObservableTableViewController<Person> _tableViewController;

    public ViewController (IntPtr handle) : base (handle)
    {
    }

    private MainViewModel Vm => Application.Locator.MainViewModel;

    public override void ViewDidLoad ()
    {
        base.ViewDidLoad ();
        // Perform any additional setup after loading the view, typically from a nib.

        _tableViewController = Vm.People.GetController(CreatePersonCell, BindPersonCell);
        _tableViewController.TableView = PeopleTableView;
    }

    public override async void ViewWillAppear (bool animated)
    {
        base.ViewWillAppear (animated);
        await Vm.InitAsync();
    }

    public override void DidReceiveMemoryWarning ()
    {
        base.DidReceiveMemoryWarning ();
        // Release any cached data, images, etc that aren't in use.
    }

    UITableViewCell CreatePersonCell (Foundation.NSString reuseId)
    {
        var cell = new UITableViewCell(UITableViewCellStyle.Default, null);
        return cell;
    }

    void BindPersonCell (UITableViewCell cell, Person person, Foundation.NSIndexPath path)
    {
        cell.TextLabel.Text = person.FullName;
    }
}
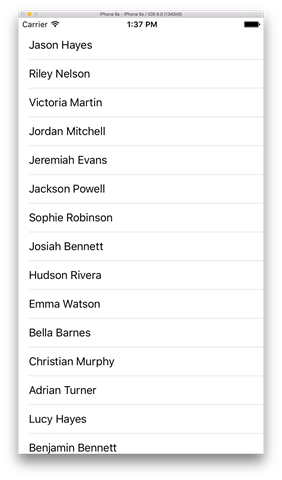
Now all that is left to do for us is again fire up the iOS Simulator to verify all is correct and there we have it, the same C# code we used for our WPF and UWA apps is now running under iOS:
Android
What we did under iOS we can also replicate under Android. Though not part of the Microsoft eco system the model should be more familiar if you have written WPF, Modern Apps (and all the other fancy names they had i.e. Universal Apps). Under Resources/Layouts there is the main.axml which is a (Application) XML file we can edit to tell the Android OS how to render the UI. Sounds a bit like XAML right? And the concepts do overlap in some parts too. Adding a ListView to the XML and set the id of the element which will allow us to access it later on:
<?xml version="1.0" encoding="utf-8"?>
<LinearLayout xmlns:android="http://schemas.android.com/apk/res/android"
    android:orientation="vertical"
    android:layout_width="fill_parent"
    android:layout_height="fill_parent">
    <ListView
        android:layout_width="fill_parent"
        android:layout_height="fill_parent"
        android:id="@+id/PeopleListView" />
</LinearLayout>
Again we will have to setup the locator. Under Android there is no fixed setup point, so we will use a static class Locator.cs and property which we will access from the Android app:
internal static class Locator
{
    private static readonly Lazy<ViewModelLocator> _locator = new Lazy<ViewModelLocator>(() => new ViewModelLocator());
    public static ViewModelLocator Instance => _locator.Value;
}
Wiring up the view model is done in the MainActivity.cs, which you can think of as the code behind/ViewController equivalent. I wrote about this binding in more detail in a former blog post which you can find here.
[Activity(Label = "PclSample.Droid", MainLauncher = true, Icon = "@drawable/icon")]
internal class MainActivity : Activity
{
    protected override async void OnCreate(Bundle bundle)
    {
        base.OnCreate(bundle);

        // Set our view from the "main" layout resource
        SetContentView(Resource.Layout.Main);

        await Vm.InitAsync();

        // Get our button from the layout resource,
        // and attach an event to it
        PeopleListView.Adapter = Vm.People.GetAdapter(GetPersonView);
    }

    public ListView PeopleListView => FindViewById<ListView>(Resource.Id.PeopleListView);

    private MainViewModel Vm => Locator.Instance.MainViewModel;

    private View GetPersonView(int position, Person person, View convertView)
    {
        View view = convertView ?? LayoutInflater.Inflate(Android.Resource.Layout.SimpleListItem1, null);

        view.FindViewById<TextView>(Android.Resource.Id.Text1).Text = person.FullName;

        return view;
    }
}
Note that the id we previously set allows us to retrieve the UI control.
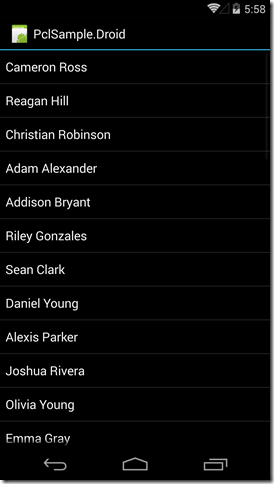
At this point we can start up the Android Emulator and just to have mentioned it Visual Studio 2015 provides a great Android Emulator – way better then the stock emulator! And once again we can see the app is running reusing the C# code we tucked away in our PCL.
Conclusions
In this blog post we saw how one can share C# code with a Portable Class Library (PCL). The PCL can be included in all major C# stacks .Net, UWP, Silverlight, Xamarin etc. and though the capabilities in the PCL are more limited then a standard .Net library it does allow to share code from a legacy WPF/Win Forms app to a mobile application.
PCLs can be extended by installing further NuGet packages such as storage, network access and many more. The PCL has been around for a couple of years now and has proven itself to be a valuable component when writing cross platform applications.
The entire sample can be found on GitHub.

